UniFi Switch Hardware Hacking
I’m a huge fan of Ubiquiti networking equipment. My setup includes several UniFi switches, UniFi access points, and at the core an EdgeSwitch 24 PoE and EdgeRouter 4.
My office has an Ethernet drop from the EdgeSwitch, which provides PoE to power a UniFi 8-port switch. This switch also does PoE pass through to power another PoE device.
While the EdgeSwitch is actively cooled with a pair of software-controlled fans, the small UniFi switch is passively cooled, relying on a large heat sink. The processor is thermally interfaced with the bottom of the chassis, making the entire bottom case a heat sink. Given this arrangement, it’s possible to simply flip the switch over to reduce the temperature by several degrees.
My office gets warm - real warm. In the summer, the average temperature hovers around 80’F. Consequently, the poor UniFi switch (US-8) on the floor would reach temperatures of over 130’F.
While the UniFi can withstand high temperatures, prolonged periods of heat tend to decrease the lifespan of equipment not specifically designed for harsh environments, like industrial IoT hardware. That’s why I decided to really void my warranty by adding a fan to the UniFi’s case.
It’s easy to open the case - just two screws. Here’s what it looks like inside:
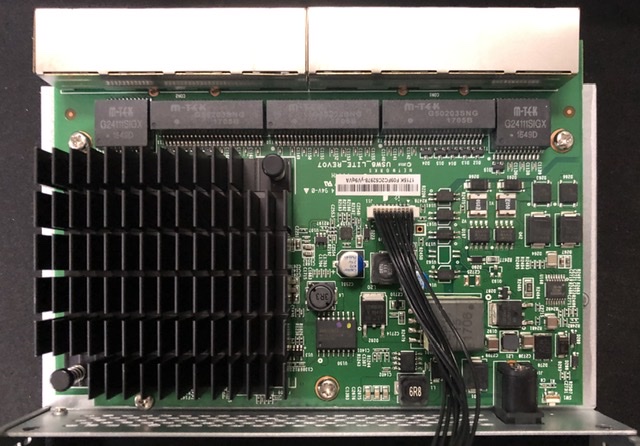
That huge heat sink does good work, but it’s not enough to keep it cool.
The plan to add active cooling is straightforward: a 5 volt Noctua fan and USB adapter so that I could power the fan either from any USB wall plug or from Ubiquiti’s PoE-to-USB adapter, mounted directly over the heat sink, exhausting out of the chassis upward. This will serve to pull more air through the side vents, across the heat sink, and out of the case.
Yep, we’re cutting a hole in the top of the switch. No more warranty.
Fortunately, the work is pretty trivial. I disconnected the top case from the bottom by gently removing the black ribbon cable that powers the activity light bar. I then removed the interface cable from the top case completely so that I wouldn’t accidentally cut the cable, something I’ve done before.
Before cutting, I traced the outline of the fan area as well as mounting holes, like so:
I went to town with a Dremel. Cutting the hole wasn’t pretty since I only had some generic cut-off wheels, but a series of cuts (and wheels) later, I had a hole. I also drilled out the four screw holes so that I could mount the fan from underneath using screws included in the Noctua kit.
I had a hard time keeping the fan in place while mounting, so I used a little Gorilla Glue to keep it steady for me. Here’s what it looks like when finished:
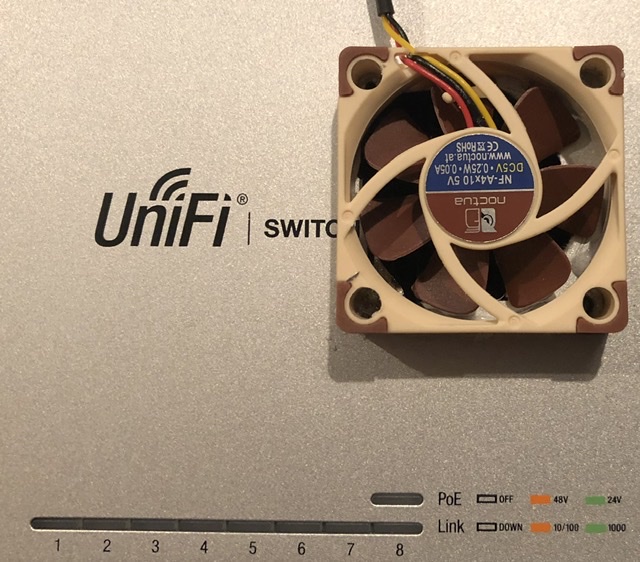
I have the fan powered from an old iPhone adapter for now. So far, the results are impressive: the switch has not cracked 85’F on top or bottom, and I can’t hear the fan at all even though it’s only a few feet away from me under my desk.
Note that these smaller switches have no temperature sensors onboard, so all my readings were taken with a Ryobi IR thermometer.